Schedule Element
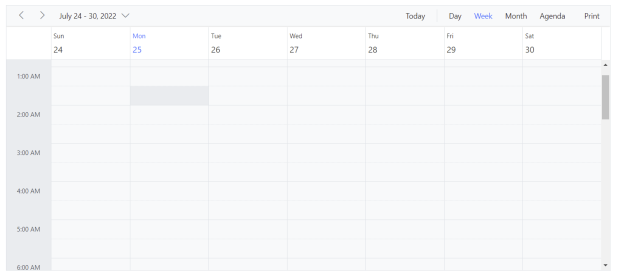
The Schedule Element allows the user to create or view one-off or recurring events using a calendar-based interface:
Click on image above to display larger
When the calendar-based interface loads, a duration for the display can be chosen using the options provided at the top of the Schedule. These include: Today, Day, Week and Month. Clicking one of these options will populate the screen with relevant time slots. For example, if you select Day, a day's worth of time slots will be shown within which events can be added. The time slots themselves are configured using the options on the Advanced Tab (see below).
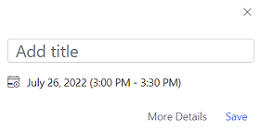
To add an event, click a time slot. This opens up a dialog box which will display the date and duration for the event, as in the example below:

Enter a title for the event, then click Save to add the event to the Schedule. If you click a time slot but decide not to create the event, click the cross in the dialog box's upper, right-hand corner.
If you click the dialog box's More Details button, this provides access to additional event features. Once the More Details button has been clicked, a Location for the event can be entered, and the Start and End times and dates can be amended. The Calendar button, 

You can also enter an optional Description for the event. In addition, you can override the event's selected time by choosing All day, and a time zone can be chosen using the Timezone option (see Note, below).
The Repeat drop-down lets you choose the recurrence of the event if you'd like it to appear more than once, and across different days, weeks and months throughout the year. If you set the repeat to Daily, you can choose the number of days that the event will appear using the up and down arrows in the Repeat every box. If you set the repeat to Weekly, an additional Repeat On option lets you choose specific days within each week that the event will occur. For Monthly, you can set the event to appear on a specific day each month, and for Yearly, a specific day within a specific month can be selected. The End feature lets you choose to never let the event end, for the event to run until a specific date, or for the event to end after a certain number of occurrences of it have taken place. When an event has been set to recurring, a recurring icon, 
Once an event has been placed on the schedule, you can hover your mouse cursor over it to reveal a tooltip which displays the event name, date and time. Clicking on a configured event will let you edit or delete it. If you choose to delete an event which is part of a recurring series, you will have the option to remove the individual event or remove the entire series.
The Agenda and Print options situated alongside the duration options at the top of the Schedule display let you see a list of forthcoming events, and allow you to print a screen-shot of the Schedule as it is displayed on-screen.
- If an event is deleted from the Schedule, it won't be removed from the Schedule database. Instead, the event ID will be retained and all of the other columns within the event row will be empty.
- To make sure the Schedule Element functions as expected, we recommend using an input- and output-mapped dataset from the form which will contain all of the required fields and field properties (see Data Tab, below).
Where data is read-in from a Datasource where the dataset hasn't been created using a previously output-mapped form, complications could arise relating to incorrect field types and field formats etc. It is possible to use a dataset which hasn't been output-mapped to a form previously, but care needs to be taken when doing this.
Once you have placed a Schedule Element on a page, you can edit the Element's properties to configure the Element for your requirements. Select the Element on the page to display its properties in the Properties Pane.
The following properties are available:

Event Data
Allows you to specify an input and output mapping for the Element. The output mapping will be used to output the entries for events when the form is submitted. The input mapping allows you to read previously output event data back in, e.g. in order to populate the Schedule at form runtime. As mentioned above, it is important to bear in mind that certain fields will require certain field type definitions (e.g. DateTime, String and Boolean etc.), and if the input-mapped dataset has been defined incorrectly, the Schedule Element may yield unexpected results.
For more information about specifying input and output mappings refer to the

Appearance Category
Show Weekend
If selected, allows weekends to appear on the Schedule Element at runtime.
Work Start Time
Sets the start time for the working day.
Work End Time
Sets the end time for the working day.
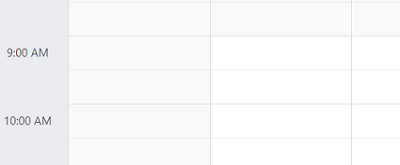
Note that the time slots either side of the configured Work Start Time and Work End Time block will be darker than the Work Time block itself. In the following image, the Work Time block starts at 9:00 AM, as denoted by the difference in time slot colour.

Start Hour
Sets the start of the day.
End Hour
Sets the end of the day.
Height
Sets the height, in pixels, of the Schedule Element frame.
Events Category
Max Inputs
Sets the maximum number of event entries the user can schedule. The figure can be entered manually, or it can be set using the up and down arrows next to the Max Inputs property box.
Max Time
Sets the maximum duration (in hours) for an event. If the user attempts to create an event which exceeds the specified maximum duration, a warning dialog box will appear advising that the event is over the designated limit. The dialog box will need to be dismissed and a new duration time set.
Allow Recurrence
Allows the adding of repeated/recurrence events.
Allow Adding
Allows the adding of events using the Schedule Element.
Allow Deleting
Allows the removal of events using the Schedule Element.
Allow Editing
Allows the editing of events using the Schedule Element. If this option is deselected and data from a Datasource has been input-mapped, the events will be read-only.
Allow Multiple
Allows user-added events to happen at the same time.
Read Only
If this option is selected, events loaded at form runtime will be read-only.
Styles Category
File Upload
Allows you to assign a style to the Schedule Element, e.g. to set the font type, size and colour.
- For events added to the Schedule Element at form run time, one of two time zones can be chosen. These are Europe/London (UTC) and British Summer Time.
- UTC stands for Coordinated Universal Time and is the time zone which is applied within SQL databases by default. Data stored in the database in British Summer Time will be interpreted in UTC format, but when the form is re-loaded, the correct time will be displayed.

